How to sew a shirt - A step by step guide and easy to follow video tutorials
- Jan 10, 2022
- 9 min read
Updated: Feb 24
Knowing how to sew a shirt is going to improve your sewing skills and knowing how to pattern cut a shirt is going to take your shirt designs to the next level!
So, whether you're a beginner sewer or have been sewing for a while, sewing a shirt can seem a little tricky which is why we've put together a series of tutorials to help you successfully create your dream shirt.

Just like I teach my pattern cutting students, start from the middle and work your way out. First, we'll start with the bodice...
I'll show you how to sew a button stand on your front bodice
Also, how to sew a shirt yoke on your back bodice.
We'll then work our way out...
I'll walk you through how to sew on a shirt collar. Trust me, you'll be a pro in no time so stick with me.
And finally, we'll tackle the shirt sleeves...
We'll start with the plackets (don't worry, they're not as scary as they seem)
Once they're complete, I'll show you how to sew on the cuffs.
Last but not least, I'll show you my easy method how to sew in a sleeve.
Okay, here we go... sewing machines, or needle and thread, at the ready. Let's get sewing!
How to sew a button stand on a shirt
Follow this step-by-step tutorial on how to sew a button stand on a shirt.
4 steps to sew a button stand on a shirt:
Before removing your pattern piece, notch each fold line at the bottom where the hem is and do the same at the top too. You should have cut 1 pair of the bodice pattern piece so do the same on the other side too.
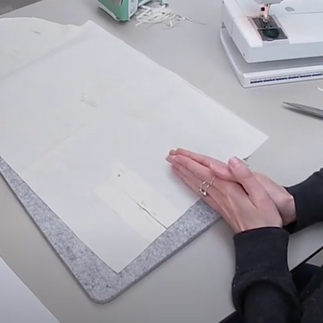
Now fold and press each fold line in- fold underneath if you don't want a fold line on top (refer to video for demonstration) and repeat on other bodice. TIP: If you have interfacing to strengthen your button stand, iron this on before you fold and press. If you don't have interfacing, make sure your button stand is going to be thick enough to hold the structure. I've added a triple layer button stand instead of a double layer to make sure it is.
You can pop a couple of pins in your button stand to secure it before you sew to make sure it's super accurate.
Lastly, sew a couple of millimetres in from the edge of your button stand (not the centre front edge) to secure it in place. Repeat on both sides (front bodice left and front bodice right). And there we have it, you can now mark on your buttons and buttonholes so it'll fasten up nicely.


Button Stand FAQ's
Q: Are both sides folded 3 times? A: Yes, both sides are folded 3 times
Q: Are both sides the same? A: Yes, but a mirror image. So, you'll sew the buttons on one side and the other will have buttonholes.
Q: Which side are the buttons on womenswear? A: Women's buttons are on the left side and men's are on the right (when you're wearing it)
How to sew a shirt yoke
I'm not yoking (sorry I couldn't resist) when I say that this will only take a few minutes. It's an easy process but can very easily confuse people too so let's break it down.
How to easily sew a shirt yoke:
If you have a dart on your shoulder seams, make sure you've marked these on and sewn them in first.
You will have cut 2 yoke pattern pieces out of your fabric. Take one of your front bodice pieces and sandwich it between the two yoke pieces with right sides of the yoke facing inwards. Pin all 3 layers at the shoulder seams and sew in place.
Repeat with the other side of the front bodice piece.
Fold both yoke pieces up and iron (refer to video for demonstration). Then you can pin along the shoulder seams, to hold them in place, as we're going to topstitch them later (this is personal preference and not compulsory).
Now, fold in your seam allowances on the hem of both yoke pieces at the back and press.
Sandwich the back bodice piece between the two yokes with the seam allowance hidden inside. Pin and topstitch along a couple of millimetres away from the yoke edge to secure in place. You can also topstitch your shoulder seams too or just remove the pins if you prefer not to. TIP: If you have a tuck on the back bodice piece, remember to iron this in before you attach it to your yoke.
Woohoo! You've cracked the yoke (last one I promise🙊)


How to sew on a shirt collar
Don't give up now! You're doing so well and we're tackling this head-on together. Grab a cup of tea (and your fave biscuit) and take a break then let's get started on the collar.
How to sew on a shirt collar: Make sure all the steps above are complete before you attach the collar and your front and back bodice is attached at the side seams too.
Before you take the paper pattern piece off the fabric, make sure all your notch points are marked. TIP: I recommend putting a couple of notches at the centre back of the collar too to make sure you line it up correctly on your back bodice.
First, you want to start with your fall piece. This is the piece that 'falls' over the stand. You will have cut 1 pair of these out so place them right side together, pin and sew around the edge from one side to the other leaving the straight edge where you attach to the collar stand (see video for demonstration). TIP: If you've got interfacing make sure you iron this on before you sew the fall pieces together.
Snip off your seam allowance corners and trim the rest of the seam allowance down to 0.5cm/1/4". Also, snip into your curve so when you turn it through it's a smooth neat curve. Now you can turn your fall through the right way carefully poking any points out. I use this tool pictured below from Merchant and Mills but you can find one similar here or use a biro pen with the lid on to poke them out and press.


4. You can now topstitch around the edge a couple of millimetres in or leave it as it is.
5. Now, take your collar stand pattern pieces (you should have cut 1 pair) and sandwich the collar fall that you've just created between the two collar stand pieces (see video above for a demonstration). Remember to match all your notches up and pin in place.
TIP: If you have interfacing for your collar stand, make sure you iron this on before you sew the collar stand pieces to the fall.
6. Sew around the curved edge then trim off any excess seam allowance trimming it down to 0.5cm/1/4". Snip into the curves again so when you turn through they are smooth and neat. Now turn through the right way and press.
And just like that, you've made a collar! 😍


Attaching your collar to the bodice:
Start by matching up your centre back notches on your collar stand and on your bodice. Also, match your front bodice and the edge of your button stand together and pin. Match any other notches along here and pin. TIP: Start with one layer - I like to start with the inside layer first so I end up topstitching on the outside which is the side you are going to see.
Now sew along to secure in place, turn the right way and lightly press.
You can then fold your seam allowance under on the remaining collar stand, press as you go and pin to hold in place.
Topstitch this down around 1 or 2 millimetres up from the edge.
Your collar is now attached to the bodice and complete.
How to sew a sleeve placket
How are you getting on? We're moving on to the sleeve now to sew the plackets and cuffs. Drop me a message on Instagram if you're struggling with anything.
How to sew a shirt placket:
Ok, so you know what I'm going to tell you to do first...that's right, make sure you've marked any notches on before removing your sleeve and placket pattern pieces. You can also cut your placket opening on the fabric on both your placket piece and sleeve piece too. TIP: If your fabric is thinner than a medium weight calico, then I recommend not cutting your placket opening lines at this point as there won't be enough structure while you sew your placket on.
Pin your placket onto your sleeve with both your sleeve and placket facing downwards (I know this seems a little strange but for sewing a placket it is completely normal). The placket is placed on the back of the sleeve. Use your notches to identify the back and the front of the sleeve. The taller side of the placket is placed towards the centre (refer to the video above for a demonstration). Remember to pin around your placket opening too.

3. Sew around the placket opening (the size of your placket will determine how far out you need to sew the line - normally marked on your pattern piece) and then flip your placket the right way around (refer to the video above for a demonstration).
If you haven't already cut your placket opening, you will need to do this now cutting up the line and snipping a 'Y' shape at the top. This will enable you to easily flip the placket the correct way.
TIP: If your corners aren't turning through properly on your placket, snip into the corners a little
more and then try to flip it the right way again.
4. Now press your placket so it lies neatly and flat. Then fold your seam allowance under on the edges of your placket, including the placket point and press.
5. I suggest watching the video above carefully for this step. Next, we're going to fold and press in the fold lines. Starting with the shorter edge, fold towards the placket opening and press flat, fold back in half and press again. Repeat on the longer edge of the placket.
TIP: Create your placket at least 2cm wide if you don't want it to be too fiddly when pattern cutting a placket.
6. Pin all of this in place and sew down the shorter edge of the placket first hiding the previous stitch
line. I recommend sewing 1 millimetre from the edge (not from the placket opening edge)
7. Now move the placket edge you've just sewn out the way and repeat step 6 for the loner edge of the placket. You can also topstitch the top opening of the placket hiding any raw edges (refer to the video above for a demonstration on completing your placket ).
TIP: You can use this exact method to create a placket for any other situation too like the top of a bodice opening.


How to sew on a shirt cuff
How to sew on a shirt cuff:
Let's get the ball rolling by making sure our notches are all marked on. Also, mark on where your buttons are going to go too (If you're making a toile, this is helpful to do so you can check they'll sit in the right place)
Then, if you have an all in one cuff pattern piece with a fold line down the middle, fold your cuff in half lengthways, and sew down both edges at either end. TIP: If you want to interface your cuff to strengthen it, make sure you iron this on before you fold it in half and sew.
Cut off your corners before you turn through to make sure your edges are crisp neat points. Turn your cuff through the right way around poking your corners out and press.
Now we're going to attach the cuff to the sleeve. Taking one layer of the cuff, pin it to the wrong side of the sleeve. Sew around using your seam allowance amount to secure in place.
Turn the sleeve the right way through. Take your other cuff layer and fold the seam allowance under and press. This will then lay flat on the sleeve where the previous stitching is. Pin and topstitch in place 1 or 2 millimetres from the edge.


How to easily sew in a sleeve
You're doing amazing! We're very nearly done and you'll soon be strutting around in your beautiful new shirt. You can also find my top 5 tips to easily sew in a sleeve here.
How to sew in a sleeve:
Start by pinning your side seam and underarm seam together at the notches (2 at the back and 1 at the front) then match the top of the sleeve head up with the shoulder seam and pin. That way you already have markers to work with. TIP: Make sure you've notched the top of the sleeve head. This makes it easier when matching up with the shoulder seam and will ensure your sleeve falls correctly and is not twisted.
Now pin in the extra fabric between the notches to hold in place. If you start at the bottom of the armhole it makes this step easier. Gently ease the fabric in and pin in areas where there seems to be more fabric.
Finally, sew in place using your seam allowance. TIP: If you're worried about sewing it so permanently - sew around it once with a longer stitch length slightly closer to the raw edge than your seam allowance to secure it in place.


CONGRATULATIONS! You've completed your shirt. Remember to sew on the buttons and sew your buttonholes.


To take your shirt designs to the next level, come and learn how to create your own sewing patterns in just 60 minutes with my FREE masterclass. Once you know how to pattern cut you can really experiment with cuff designs, create unique collars, transform your shirt sleeves and so much more just like in the images below.


Already know how to pattern cut and looking for blocks to draft your own shirt? We recommend starting with the woven bodice and sleeve blocks which you can download here.
For more great tips and tutorials on sewing and pattern cutting, come and join me over on my Instagram @thesewingretreat.
Happy creating,
Sarah xxx


Numerous browser-based games that don't require installation or download are available on the website Cool Games. It has grown in popularity as a destination for players seeking rapid, easily available entertainment across a variety of genres.