How to begin working with pattern blocks - The basics of pattern cutting - Part 2/3
- Feb 12, 2021
- 7 min read
Updated: Feb 24
Pattern cutting is such a valuable skill and it's the one thing that will upgrade your sewing game as it helps you understand your sewing patterns and allows you to adapt them to your style, shape and size.
To create your own sewing patterns the easiest way to start and the most common way to start is to use PATTERN BLOCKS (Otherwise known as slopers).

What's the difference between pattern blocks and sewing patterns
Before you begin your pattern cutting journey, it's really important that you know the difference between pattern blocks and sewing patterns. It's so easy to get confused between them so let me help you spot the differences.
What are Pattern Blocks (Slopers)?
Pattern blocks (also known as slopers) are basically stencils that you can use to start creating your sewing patterns.
They don’t have any seam or hem allowances or design features and represent the minimum amount of fabric needed to cover the body.
They are usually made from thick card so they can be used over and over again as stencils.
They act as templates which can be drawn around to make a copy and then adapted to your design.
Below is an image of a half-scale front bodice block and a back bodice block. I'll explain more about the different scales below as they're very useful.

Okay, so let's break it down a bit more...
Let's say you want to make a top and you have something in mind that you'd like to make.
You start searching for a sewing pattern online that is as similar as possible to your design. However, you can't find one that's just right.
This is where the pattern blocks come in... Instead of searching high and low for the perfect shop-bought sewing pattern, you would draw around your pattern blocks (your stencils) and start drafting your pattern from these.
You can add design features, annotations and more when drafting your patterns which you can learn about here in my FREE eBook. Finally, you would add seam and hem allowance to your pattern pieces and just like that you've created a sewing pattern for your dream top!

TIP: Never alter your pattern blocks. Always trace around them onto a different piece of paper and create your pattern from there
Did you know: Each clothing company will have its own set of pattern blocks that they will use to make all of their designs. This is why you may be a certain size in one shop, but have to go up or down a size in another shop.
What really is a sewing pattern?
A sewing pattern is normally made up of different pattern pieces. The image below shows a variety of shop-bought sewing patterns which are ready to place on your fabric and cut out. They already have seam and hem allowance included, so all you need to do is trace around each pattern piece on your fabric, cut it out and sew the fabric pieces together to make the garment.
With just a bit of pattern cutting knowledge, you can adapt your sewing patterns to fit better and alter them to your style too.

Below is a sewing pattern of a shirt sleeve. I used my sleeve block to draft the sewing pattern and you may notice that these examples are different scales and that's just so you can see the detail on different pieces better.
You can see the original sleeve block outline on the sewing pattern piece. I've also added a dart into the sleeve at the elbow to give it a better shape, added a placket and, last but not least, I've added seam allowance. TIP: Always add hem and seam allowance last when pattern cutting

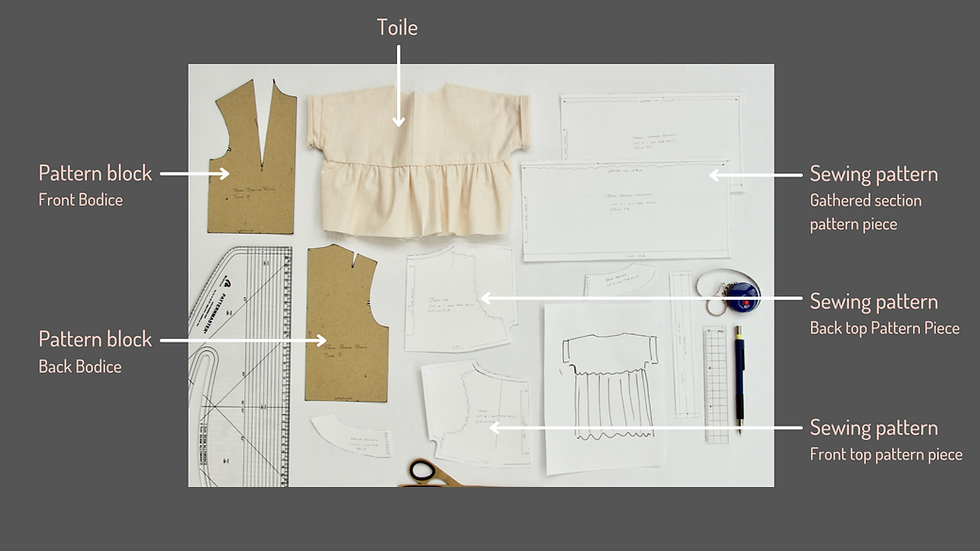
So, let's look at everything together. Here's a diagram of the blocks and sewing pattern pieces. Look at the diagram carefully and notice how I've used the pattern blocks as a template (you can see the original lines of the pattern blocks on the sewing pattern pieces).
Remember: Pattern Blocks + Basic Pattern Cutting Knowledge = Your Own Sewing Patterns
Why are there so many different types of pattern blocks?
You may have noticed that there are many different pattern blocks that you can purchase or create yourself but why are there so many?
From stretch blocks to woven blocks, from trouser blocks to jacket blocks, from size 10 blocks to custom-sized blocks, there really are so many different types but don't let this overwhelm you!
In actual fact it's a great thing there are so many and you'll probably find you only use a few of them anyway.
With so many options it means that a lot of the hard work is already done for you so that you can focus on the design you'd like to create rather than spend a lot of time on the technical side.
If you'd like to draw up your own blocks I recommend Metric Pattern Cutting for Womenswear. There is also a childrenswear, menswear and activewear version too. The instructions are a little shorthand but they work really well.
If you'd like the hard work of drawing them all done then hop on over to my printable blocks that you'll find here.

How do you choose the right blocks for your project?
Decide what garment you're designing for - trousers/ a skirt/ top etc.
Are you creating for a stretch or woven fabric - this will dictate the types of blocks you use
Do you want your design to be easy fitting or fitted - if you want it to be easy fitting then the blocks will have more ease in them (aka. more wriggle room)
Choose your size (or if you're creating your own then you can do it to your size or adjust generic sized blocks to fit)
To learn exactly how to use your pattern blocks and create sewing patterns that fit you perfectly, click here to find out more about my signature 8-week fitting course, Fitting Confidence.
Here's a few examples of what the blocks will look like
Various pattern blocks for woven fabrics:

Various pattern blocks for stretch/knit fabrics:
You'll see they don't have any darts in them, this is because stretch/knit fabrics naturally tend to shape around the body whereas many woven fabrics don't.

If you'd like to start creating your own sewing patterns that fit you perfectly, instead of spending hours trying to find the 'perfect' sewing pattern that doesn't quite fit your unique body shape and isn't what you'd imagined, then click here to find out more about my signature 8-week fitting course, Fitting Confidence.
What to use the half/quarter-scale blocks for?
If you already follow me on Instagram you'll know that I always recommend using quarter-scale and half-scale blocks first when you're pattern cutting and testing out a new design.


Pictured on the left is the quarter-scale blocks and on the right is the half-scale blocks.
I know the sizes don’t necessarily look like they are half and quarter-scale compared to the full-scale blocks, but I promise you they are! If you start with a quarter-scale block, you simply multiply the new measurements that you've added by 4 to get your full-scale measurements or if you’re using the half-scale blocks, then you multiply any new measurements by 2.
For example - a 1cm pleat width in quarter-scale would be 2cm in half scale and 4cm in full scale.
These small blocks are amazing to use for trying out pattern cutting techniques, they're great for beginners to practice with and are perfect for trying out a new design. Instead of spending time drawing up a full-scale sleeve and trying to do it really neatly when you may not use that version, you can use the half or quarter-scale to test it first. They're a great time and money saver!
The quarter-scale blocks are great for getting the hang of techniques, however, I don't tend to use these to toile my design as it can get quite fiddly when sewing. This is where the half-scale blocks come in handy!
The half-scale blocks are the perfect size to test and toile your designs and to practice creating your own sewing patterns.
Below I used the half-scale blocks to test my shirt design. Super cute right?!

To discover more about quarter-scale & half-scale blocks, follow me on Instagram where I often share lots of tips and tricks about them.
Full-Scale Blocks
Full-scale blocks are great for testing the fit and to perfect your design one you've tried it in half-scale.

Once you have used the smaller scale blocks to test your design you can multiply the measurements, just like I mentioned earlier, and apply this to your full-scale pattern.
For example, in the image below I used a half-scale block. To create it in full-scale I would simply double any measurements that I've added.
Let's say that I added 4cm to the shoulder seam on the front and back, I would take my full-scale blocks, trace around them to make copies and then add 8cm to the shoulder seam on the front and back.
(half-scale new measurement x 2 = full-scale new measurement).

To summarise:
Quarter-scale Blocks ---> Great for testing the techniques and to practice with
Half-scale Blocks ---> Perfect for testing the design & to save time and money
Full-Scale Blocks ---> Ideal for testing fit and to perfect your design.
If you'd like to know more about creating perfectly fitting clothes, you can discover more about my signature 8-week fitting course, Fitting Confidence, here. To learn more pattern cutting tips and tricks follow me on Instagram at @thesewingretreat
Happy sewing,
Sarah x
P.S. I'm a real person, send me a DM on Instagram or send me an email hello@thesewingretreat.co.uk if you have any questions, I'd love to hear from you and I reply to everything personally :)


Sau một thời gian trải nghiệm, trang chủ 28bet khiến tôi chú ý nhiều hơn đến cảm giác tương tác giữa người dùng và giao diện. Tôi ưu tiên những nền tảng không bắt người dùng phải thực hiện quá nhiều thao tác cho một nhu cầu đơn giản. Trong quá trình sử dụng, tôi có thể theo dõi các bước khá dễ dàng nhờ cách hiển thị thông tin theo trình tự hợp lý. Việc chuyển đổi giữa các mục cũng không tạo cảm giác rời rạc, giúp toàn bộ trải nghiệm diễn ra liên tục. Với tôi, đây là yếu tố ảnh hưởng đáng kể đến mức độ thoải mái khi sử dụng lâu dài.
Trong quá trình sử dụng hằng ngày, Trang Chủ EV99 duy trì cách hiển thị khá nhất quán giữa các khu vực chức năng. Người dùng có thể dễ dàng theo dõi các thông tin trên màn hình nhờ bố cục được sắp xếp gọn gàng. Việc mở các danh mục hoặc quay lại trang trước không yêu cầu nhiều thao tác, giúp tiết kiệm thời gian khi sử dụng. Trên phiên bản di động, các nút chức năng vẫn được hiển thị đầy đủ và thuận tiện để thao tác bằng màn hình cảm ứng.
Qua thời gian tự mình trải nghiệm, Đăng nhập 98win để lại cho tôi ấn tượng ở khả năng hiển thị ổn định trên nhiều kích thước màn hình. Tôi thường chuyển đổi giữa điện thoại và máy tính trong cùng một ngày nên khá quan tâm đến sự khác biệt khi thao tác. Các danh mục vẫn được bố trí hợp lý, tốc độ phản hồi duy trì ổn định và không tạo cảm giác rối mắt. Với tôi, đây là yếu tố giúp việc sử dụng diễn ra liên tục mà không cần mất công làm quen lại trên từng thiết bị.
Trước đây mình chỉ nghĩ các nền tảng sẽ tập trung vào thể thao, nhưng khi xem https://s8bets.org/ thì lại dành nhiều thời gian hơn ở khu Esports. Các bộ môn như Liên Minh hay Dota 2 được đặt riêng nên khá dễ theo dõi. Một điểm khác mình ghi nhận là hệ thống sử dụng máy chủ đặt tại nhiều khu vực, nhờ vậy quá trình truy cập giữa các chuyên mục diễn ra ổn định hơn so với mình kỳ vọng ban đầu.
Trong lần đầu sử dụng https://ev88.fyi/, mình chủ yếu dành thời gian khám phá cách bố trí các chuyên mục và thử thao tác trên nhiều thiết bị khác nhau. Sau khi đã quen với giao diện, mình hình thành thói quen truy cập theo cùng một trình tự mỗi lần sử dụng. Việc ghi nhớ vị trí của từng chức năng giúp mình giảm thời gian tìm kiếm so với ban đầu. Phần lớn trải nghiệm đến từ quá trình làm quen với cách điều hướng và sử dụng các mục theo đúng nhu cầu của mình.