How to draft and sew an all-in-one facing - The burrito method
- Oct 6, 2021
- 3 min read
Updated: Feb 24
A facing is a separate piece of fabric sewn on the inside of the garment, often sewn onto a main pattern piece to strengthen it and or finish the raw fabric edge. They are commonly used on the neckline and armholes.
An all-in-one facing includes the neckline and armhole facing all in one pattern piece instead of separate pattern pieces for each. They're perfect to draft for many sleeveless top patterns to create a beautiful and seamless finish on both the inside of the garment and outside.


How to draft an all-in-one facing
It's super easy to draft the pattern for an all-in-one facing when you know how and I've broken it down into 5 simple steps for you. You'll soon have transformed your beautiful sleeveless top, ready to pair with your long sleeve turtle neck for the crisp autumn mornings ahead.
5 simple steps to draft an all-in-one facing for a sleeveless top:
Mark on your front bodice pattern where you'd like the facing to go
Trace off the facing area
Do the same with the back making sure the sides match in length
Trace off the facing pieces
Add on any annotations
Cut out ready to use


How to sew an all-in-one facing
When you know how to pattern cut, you'll find it's a lot easier to sew your garment together because you have a better understanding of the construction of the garment and each pattern piece needed to create it.
How to sew an all-in-one facing - the burrito method:
P.S. (it's called the burrito method because of how it's rolled)
With right sides together, take both facing pieces and sew the shoulder seams together. Repeat with the main fabric.
Finish your hem on the bottom of the facing. This will make it neat and easier when sewing the rest together. You could use a zigzag stitch, overlocker/serger or a preferred hem of your choice.
Lay the main fabric piece out right side up and place your facing piece flat on top with right side down. Pin together to hold in place.
Sew around the neckline securing it all together. TIP: Once you've sewn the neckline, I recommend understitching it. This means you'll be stitching the facing down onto the seam allowance 1 or 2 millimetres in from the main seam edge. This will make sure the facing sits neatly inside the top when turned the correct way and won't be visible.
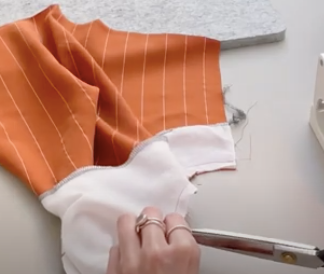
Remember to snip into the curve of your neckline to help create a beautiful flat neckline curve then press. TIP: The more curved the area is, the more snips you want to add. For example, I have snipped along the curve approximately every 1.5cm or 5/8" but you can snip every 1cm or 3/8" if needed.
Lay everything out flat again and roll the side of the top and facing lengthways towards the other edge (refer to the video above for a demonstration). Now flip the facing section back on itself encasing the roll inside and match up with the main fabric.
Pin around the armhole and sew using your seam allowance. Remember to snip into any curves before you turn the right way. Now turn the right way and press.
Repeat steps 6 and 7 for the other side too.


You have now completed your all-in-one facing and you're ready to sew up your side seams, finish any hems and final touches.
To learn how to draft your own sewing patterns come and join me on my FREE masterclass. In just 60 minutes, you'll learn how to take your design and transform it into dream clothes that you can wear.

I can't wait to see you inside the masterclass and to answer any of your pattern drafting questions.
Happy creating,
Sarah xxx


I just found your site and I'm really excited to learn new techniques. Thank you Brenda